

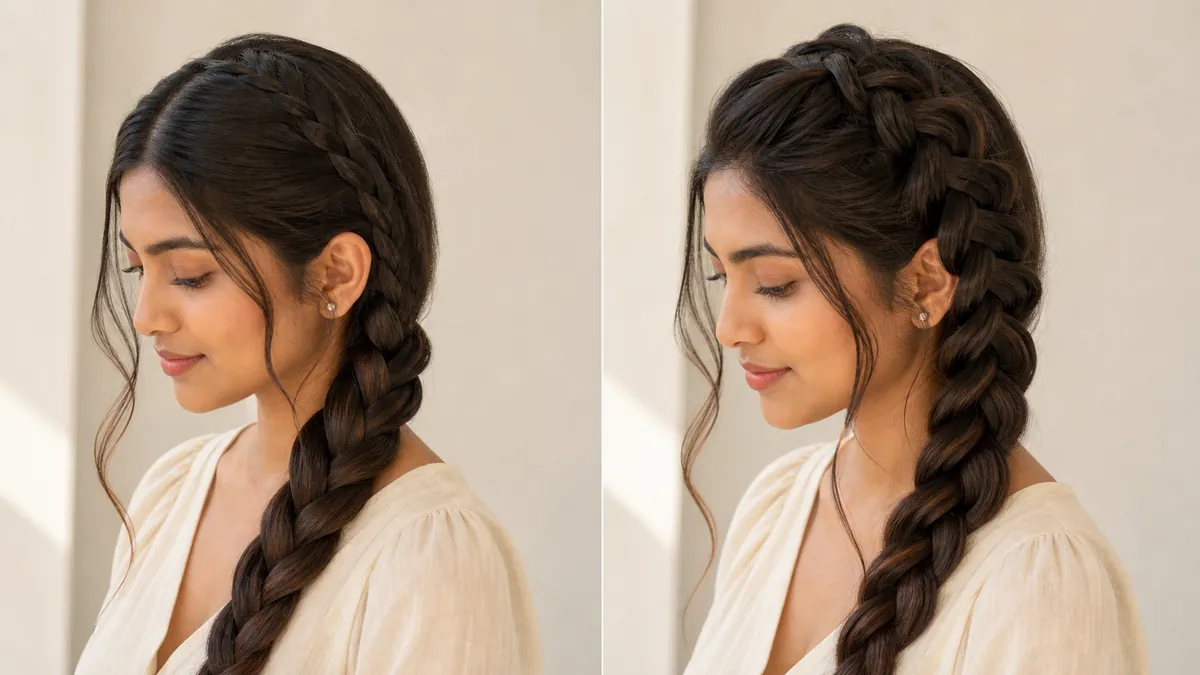
A french braid is woven with an overhand technique: each section lays over the middle strand, so the plait sits flat against your head. A dutch braid flips that. Each section crosses under the middle strand instead, and the braid pops up and out in a raised, three-dimensional shape. One reversal in direction.
That's the whole french braid vs dutch braid debate, and it changes how each style looks, holds, and behaves on different hair types. This guide walks through exactly how each braid is built, how to do both yourself, and how to choose the right one for your hair, your day, and whatever you tell your stylist next time you're in the chair. By the end, you'll be able to spot which is which at a glance instead of guessing from a photo.
French Braid vs Dutch Braid at a Glance
French Braid vs Dutch Braid at a Glance
A french braid is a three-strand plait. Each outer section crosses over the middle strand as you work down the head, which keeps the finished braid smooth and flush to the scalp. A dutch braid is also a three-strand plait, but each section crosses under the middle strand instead of over it. That underhand cross pushes the plait upward and gives it a raised, sculptural look.
The core difference between french braid and dutch braid comes down to one directional swap: overhand for french, underhand for dutch. Everything else about how the styles look and behave follows from there. Once that single swap clicks for you, telling the two apart in a photo or a tutorial title gets a lot easier.
You'll sometimes hear a dutch braid called an "inside out french braid" or a "reverse french braid." It's not a different style, just a different name for the same underhand technique. Some stylists and tutorials use these terms interchangeably, so if you see "reverse french braid" on a Pinterest board, that's the dutch braid you're picturing. Learning both names will save you confusion when you're searching for tutorials or describing a look to a friend or stylist.
What Is a French Braid?
A french braid is the classic three-strand plait most of us learned first. You build it by crossing each side section over the middle strand and adding new hair into each pass as you move down the head. Because the crossing motion goes over rather than under, the finished braid lies smooth and close to the scalp, with a flat, polished appearance. It's the braid you reach for on an ordinary weekday, for french braid pigtails on a school run, or as the foundation under a low bun or half-up style when you want texture without volume.
What Is a Dutch Braid?
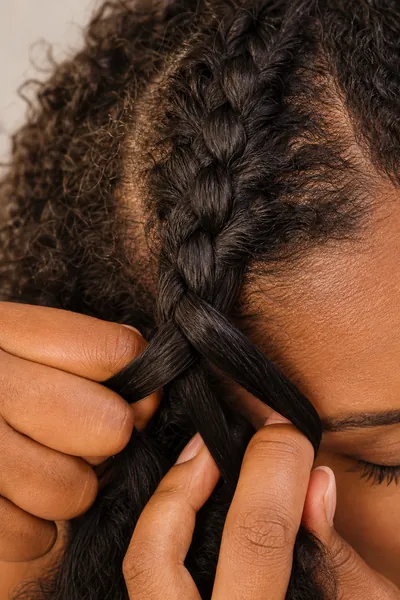
A dutch braid follows the same three-strand structure but flips the direction: each section crosses under the middle strand instead of over it. That underhand motion pushes the braid outward and upward instead of flattening it, which is why dutch braids have that raised, almost 3D texture. You'll see this style constantly in workout hair, festival looks, and crown braid variations. The lifted shape holds up better through movement and reads as more dramatic in photos.
Key Differences Between French and Dutch Braids
Key Differences Between French and Dutch Braids
Once you understand the overhand versus underhand split, the rest of the comparison is easy to scan. The table below breaks down how that one technique difference plays out across finish, difficulty, hair fit, and hold time, so you can see the full picture in one place instead of piecing it together from a dozen tutorials. Skim it once and you'll know which braid fits your hair before you even pick up an elastic.
| Feature | French Braid | Dutch Braid |
|---|---|---|
| Braiding technique | Overhand (strands cross over the middle) | Underhand (strands cross under the middle) |
| Visual finish | Flat, smooth, close to the scalp | Raised, dimensional, sits on top of the hair |
| Difficulty for beginners | Easier to learn first for most people | Takes a bit more practice to feel natural |
| Best hair length/texture fit | Fine to medium, straight to wavy hair | Thick, curly, or coily hair; also great for fine hair that needs volume |
| Typical hold time | 1 to 2 days with light prep | 1 to 2 days, often slightly longer at the crown |
Why do dutch braids look more voluminous? The underhand crossing motion forces the plait to sit on top of the hair instead of blending flat into it. If you have fine hair and feel like every braid looks a little thin or limp, that lifted structure is doing real work for you.
It's also why a dutch braid tends to stay neater on very thick or coily hair. The braid doesn't need to stay perfectly flush to the scalp the way a french braid does, so it has more room to hold its shape without fighting your hair's natural volume. A french braid on that same hair type often has to fight gravity and texture at once, which is why it can look bumpier by comparison.
How to French Braid Step by Step
How to French Braid Step by Step
A solo french braid takes most beginners somewhere between 10 and 15 minutes, while having someone else braid your hair usually cuts that down to 5 to 8 minutes since they can see and control the sections more easily. Practice a few times before you judge yourself on speed, because the motion feels awkward at first even if you've watched a dozen videos. Once your hands know the pattern, you'll be able to do it almost without looking.
- Section a triangle of hair at your crown, from temple to temple, and split it into three even strands.
- Cross the right strand over the middle strand, then the left strand over the new middle strand, just like a standard three-strand braid.
- Before your next cross, pick up a small new section of hair from the right side and add it into the right strand before crossing it over the middle.
- Repeat on the left side, adding a new section into the left strand before crossing it over the middle.
- Continue alternating sides, always crossing over and always adding fresh hair, working your way down toward the nape of your neck.
- Once you run out of hair to add, finish the remaining length as a standard three-strand braid, crossing over each time.
- Secure the end with a small elastic, then gently tug on the outer loops of the braid if you want a slightly looser, fuller look.
- Smooth any flyaways along the part line with a little edge cream or a light-hold gel on your fingertip.
Two mistakes trip up most beginners on a french braid. The first is pulling the strands with uneven tension, so the whole braid drifts to one side. The second is grabbing sections that are too thick near the top, which makes the first few crosses bulky and hard to control. Keep your sections small and consistent at the crown, and check in a mirror every two or three crosses until the pattern feels automatic. If you want a deeper walkthrough with more troubleshooting photos, our french braid tutorial breaks the technique down even further.
How to Dutch Braid Step by Step
How to Dutch Braid Step by Step
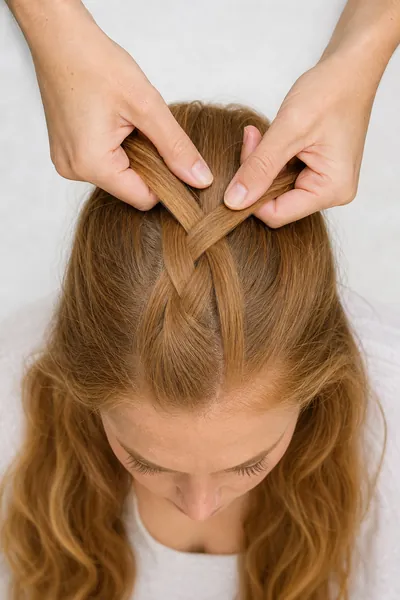
The dutch braid uses the exact same section-and-add pattern as the french braid, just flipped. Expect it to take a little longer than a french braid at first, often 15 to 20 minutes solo, because the underhand motion feels backward if your hands are used to braiding over rather than under. Once it clicks, though, the extra time gap between the two styles mostly disappears.
- Section a triangle of hair at your crown, from temple to temple, and split it into three even strands, exactly as you would for a french braid.
- Cross the right strand under the middle strand, then the left strand under the new middle strand.
- Pick up a new section of hair from the right side and add it into the right strand before crossing it under the middle strand.
- Repeat on the left, adding a new section into the left strand before crossing it under the middle strand.
- Keep alternating sides, always crossing under this time, and keep adding fresh hair as you move down the head.
- Once you're out of hair to add, finish the remaining length as a standard under-crossing three-strand braid.
- Secure the end with an elastic, then gently pull the outer loops apart with your fingers to emphasize the raised, dimensional look.
- Set any loose pieces at the hairline with a small amount of styling cream so the finished braid looks intentional rather than just undone.
The most common beginner mistake with a dutch braid is letting sections slip out from underneath instead of pinching them firmly as you cross. That's what creates a lumpy, uneven braid instead of a smooth, raised one. Hold each strand snug against the others as you work, and don't rush the under-cross since that's the motion your hands need the most practice with. For more full styling ideas built on this technique, our dutch braid styles roundup shows how far you can take it once the base braid feels comfortable.
Which Braid Should You Choose for Your Hair and Occasion
Which Braid Should You Choose for Your Hair and Occasion
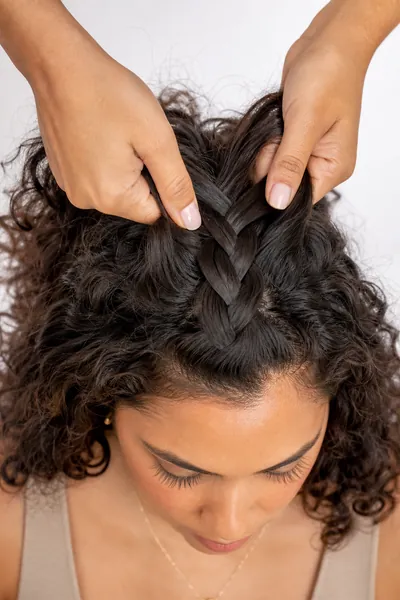
Choosing between these two styles gets a lot easier once you match the technique to your hair texture, instead of just picking whichever one looks prettier on Pinterest that day. Dutch braids tend to hold their shape better on thick, curly, or coily hair, because the braid sits on top of your hair rather than needing to stay pressed flat against the scalp, which is a much easier ask when your hair naturally wants volume anyway. French braids, on the other hand, often look neater and more polished on fine or straight hair, since a flatter finish reads as put-together rather than flat in a bad way and you don't need extra structure to keep the plait from collapsing. Fine hair that struggles to hold a raised dutch braid usually settles into a french braid without any fuss.
Occasion matters just as much as texture when you're deciding which braid to wear. A dutch braid is the better pick for workouts and active days, since the raised structure stays secure at the crown and resists flyaways even through sweat and movement, making it a smart choice before a run, a class, or a long day of errands. A french braid tends to suit polished everyday or office looks better, since the flatter finish photographs cleanly and pairs well with structured outfits, though either braid can work for an event depending on the finished style, like a braid worked into an updo or left loose with soft face-framing pieces. Think less about which braid is "fancier" and more about which finish matches the rest of your look.
Realistic hold time matters too, since neither braid is a wash-and-forget style despite what some tutorials imply. With proper prep, meaning clean but not freshly washed hair and a light texturizing spray before you start, both a french braid and a dutch braid typically hold well for 1 to 2 days, including overnight wear if you sleep with the braid loosely covered or in a soft bonnet. Keeping either braid snug but not painfully tight matters too, since the American Academy of Dermatology notes that hairstyles pulled tight enough to cause pain or tension at the hairline can lead to traction alopecia over time. To refresh either braid on day two, smooth flyaways along the part with a boar-bristle brush and touch up the hairline with a small amount of edge gel — for more day-two rescue tricks and product picks that actually hold up under a braid, take a look at our braid care products guide. If you'd rather have a stylist do the work, try saying, "I'd like an underhand dutch braid, not flat to the scalp," if you want that raised, dimensional finish, or "Can you do an overhand french braid close to my head?" if you're after the classic flat plait, since naming the technique instead of just pointing to a photo helps your stylist understand exactly which direction you want the strands crossed.
Best for Beginners
Most beginners find the french braid easier to learn first. Its overhand crossing motion mirrors a standard three-strand braid that most of us practiced as kids, so your hands already have some of the muscle memory. The dutch braid's underhand cross asks your fingers to work in a slightly unfamiliar direction, so it usually takes a few extra practice runs before it feels natural. If you're brand new to braiding altogether, our beginner braid ideas collection is a gentle place to start building confidence before you tackle either style.
Braided Hairstyles to Try With Each Technique
Braided Hairstyles to Try With Each Technique
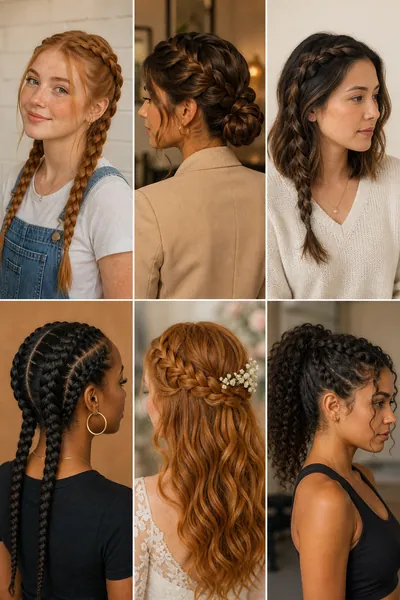
Seeing each technique applied to a real style makes the difference between french braid vs dutch braid click in a way that a diagram alone can't. Below are a few favorites for each, along with an honest note on who each one suits and what kind of upkeep to expect, so you're not walking into a look with the wrong expectations. None of these need anything beyond the base technique you just practiced above.
French braid pigtails work well on medium to long, fine or straight hair and read as fresh and low-effort, though the double part down the middle can look a little severe on rounder face shapes unless you soften it with face-framing pieces. French braid into a low bun suits almost any hair type and holds especially well for office days or travel, since the bun locks in the braid's ends and buys you an extra day of wear. Single side french braid is a great pick for shoulder-length hair or anyone easing into braiding, since it only requires managing one side of your head, though it does need occasional touch-ups near the ear as hair naturally works loose.
Double dutch braids are a go-to for thick or curly hair, because the underhand structure holds shape all day without fighting your hair's natural texture. That makes them a favorite for festivals, hikes, and long travel days. Dutch braid crown works well on long hair for a bridal or event look, but it's more time-intensive to set up and works best with a little texturizing spray so the wrapped sections don't slip loose partway through the night.
Dutch braid ponytail is one of the easiest all-day styles for workouts or humid weather, since the raised braid keeps flyaways controlled at the crown while the rest of your hair moves freely behind it. It takes barely more effort than a plain ponytail once the base braid is second nature. For a longer list of ways to wear either technique, browse our full braided hairstyles collection for more looks worth saving.
Frequently Asked Questions
Frequently Asked Questions
Is a dutch braid the same as an inside out french braid? Yes. "Inside out french braid" and "reverse french braid" are just other names for the dutch braid, since the underhand crossing technique is identical no matter what you call it. If a tutorial title uses either phrase, expect the same under-strand motion described throughout this guide.
Which braid is easier for beginners? Most people learn the french braid first because its overhand cross mirrors a standard three-strand braid, so the hand motion already feels somewhat familiar. The dutch braid's underhand cross takes a bit more practice, but it becomes just as manageable once you've done it a handful of times. Give yourself two or three practice runs on the dutch braid before judging your results.
Which braid lasts longer or holds up better overnight? Both styles typically hold for 1 to 2 days with proper prep, including overnight wear if you loosely cover your hair or sleep in a soft bonnet. Dutch braids sometimes edge out slightly at the crown thanks to their raised structure, but the difference is minor and depends more on your hair type than the technique itself. Either way, plan on a light refresh by day two rather than expecting either braid to look freshly done for a full week.
Can you dutch braid thick or curly hair? Yes, and it's often the better choice for thick or curly and coily hair, since the braid sits on top of the hair rather than needing to lie perfectly flat against the scalp. That structure works with your natural volume instead of against it, which is why dutch braids are such a popular protective and everyday option for curlier textures. A french braid can still work on the same hair, it just usually takes more product and patience to get it to lie flat.
What's the difference between a dutch braid and a fishtail braid? A dutch braid is a three-strand plait with an underhand cross, while a fishtail braid uses only two sections and weaves small pieces from each side across the middle, creating a woven, herringbone-like pattern instead of a classic plait. They can look similar from a distance, but the strand count and technique are completely different. If you want to compare the fishtail directly, our fishtail braid tutorial covers that technique in the same step-by-step format as this guide.
That's the full french braid vs dutch braid comparison: one directional flip, over versus under, changes everything about how each style looks, holds, and fits your hair. Pick the french braid when you want a flat, polished finish on fine or straight hair. Reach for the dutch braid when you need volume, structure, or all-day hold on thicker or curlier textures. Save this guide, pick your braid, and try it on wash day, then pin your favorite look below so you have it ready for next time.



Your email address will not be published. Required fields are marked *