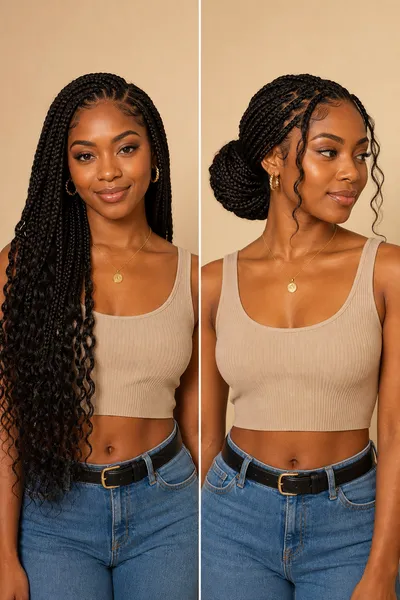
Goddess braids have a rare quality: they read as effortless and dramatic at the same time. The style pairs a sturdy cornrow base with soft, curly ends left loose for movement, which is exactly why it looks so different from a plain cornrow or a straight box braid.
The trouble with most goddess braid roundups is that a pretty photo does not help you at the chair. You need to know if the style suits your face shape and hair density, how long it will realistically hold up, and what words to use so your braider builds the look you pictured. This list tags every style below with who it suits, how it wears over time, how much effort it takes, and the exact salon script to say when you sit down.
What Are Goddess Braids?
What Are Goddess Braids?
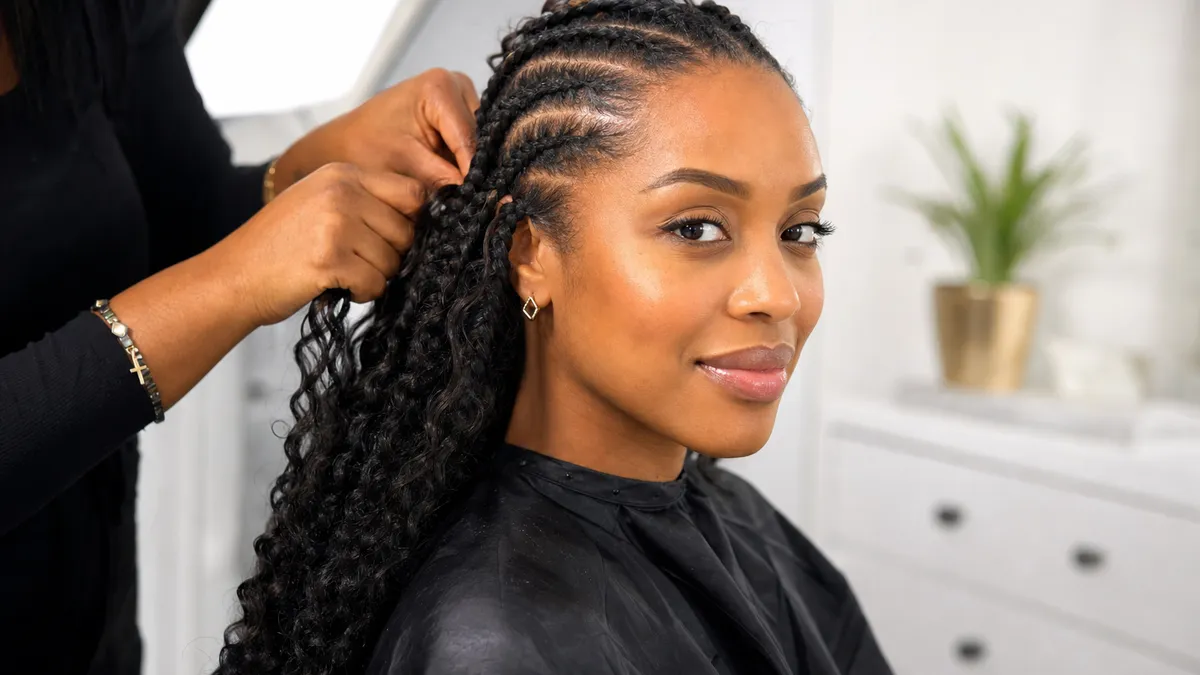
Goddess braids start with large cornrows, using feed-in or stitch technique, braided close to the scalp. The braider stops partway, leaving the rest loose in soft curls, combining a structured base with a loose, romantic tail unlike any other braid style.
Goddess braids differ from close cousins in the ends and technique. Box braids braid fully from root to tip with no loose section. Knotless braids also start flat with a feed-in technique but stay braided or straight at the ends, with a gentler start.
Most goddess braid installs use kanekalon or similar synthetic hair for the cornrows, paired with pre-curled curly hair for the ends. The amount needed varies by density: fine hair needs more added hair, thick hair needs fewer braids for the same volume.
Goddess braids sit within the wider world of braided hairstyles, which covers everything from simple three-strand plaits to elaborate updos.
How Long Do Goddess Braids Last?
How Long Do Goddess Braids Last?
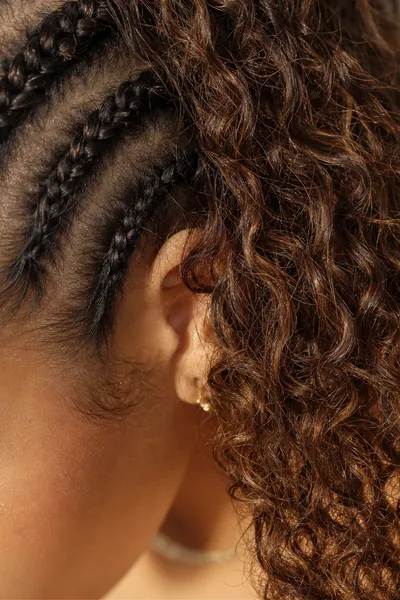
Goddess braids typically last three to five weeks, depending on braid size and scalp oil buildup. Oil your roots weekly, wrap braids in satin nightly, and refresh curly ends with cream.
A professional install is a multi-hour appointment with pricing that varies by size and stylist. Braids should never feel painfully tight; the American Academy of Dermatology warns this risks traction alopecia.
20 Goddess Braids That Make a Statement
20 Goddess Braids That Make a Statement
This gallery is built around one idea: you should never leave a hairstyle post unsure how to ask for what you saw. Every entry below carries the same four practical tags so you can scan quickly, compare styles, and walk into your appointment with language your braider will immediately understand.
Classic Goddess Braids With Curly Ends
The classic version uses medium-to-large cornrows parted in clean, straight lines from the front hairline to the nape, with the braiding stopping around mid-shaft to release into loose, defined curls. It is the most recognizable goddess braid silhouette and the safest starting point if you are trying the style for the first time.
- Best For: Oval, round, and heart-shaped faces; suits medium to thick natural hair densities best since the base needs enough tension to hold.
- Maintenance/Longevity: Typically holds three to five weeks with regular oiling; curly ends need a light refresh roughly twice a week to avoid matting.
- Styling Effort: Salon-only for a clean, even install; expect a multi-hour appointment depending on hair length and braider speed.
- Salon Script: Ask for: medium feed-in cornrows in straight back parts, with pre-curled synthetic hair left loose from mid-shaft down.
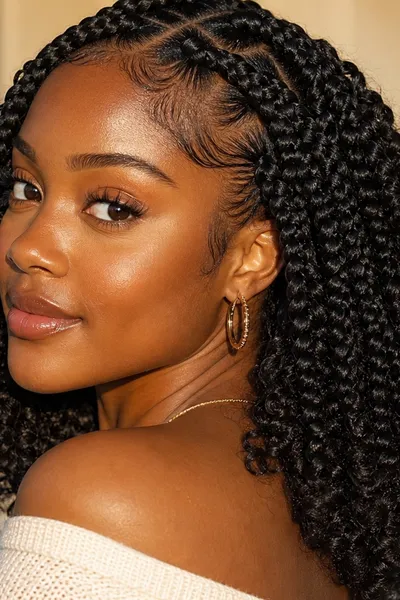
Jumbo Goddess Braids for Bold Volume
Jumbo goddess braids use noticeably thicker cornrow sections than the classic version, meaning fewer total rows but a much bolder, chunkier silhouette. The loose ends are usually left longer and curlier to balance the size of the braids, and this is one of the fastest styles to install since there are fewer individual braids to complete.
- Best For: Longer or oval face shapes that can carry visual width near the temples; works especially well on fine or low-density hair since jumbo sections create instant fullness.
- Maintenance/Longevity: Holds around three to four weeks; oil buildup shows faster near the roots, so scalp care matters more here than with smaller sizes.
- Styling Effort: Salon-only, but faster than most goddess braid styles, often two to three hours less than a micro version.
- Salon Script: Ask for: jumbo feed-in cornrows, four to six rows total, with long curly ends left loose from the ear line down.
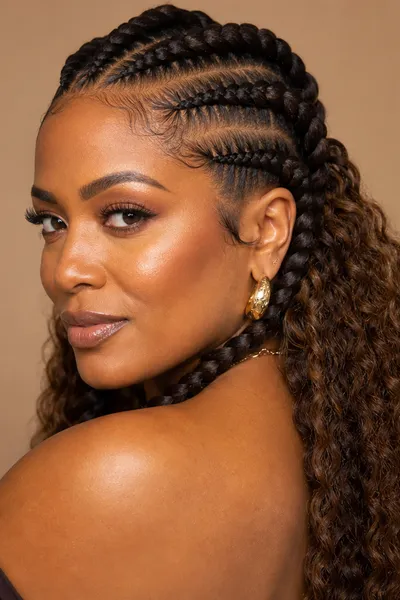
Medium Goddess Braids for Everyday Wear
Medium goddess braids sit right between jumbo and micro in scale, offering a balance of quick installation and a natural, wearable look for daily life. The cornrow rows are typically parted in a simple grid pattern, and the curly ends start around the collarbone for a versatile length that works with most wardrobes.
- Best For: Nearly all face shapes; suits medium-density natural hair particularly well since the braid size neither overwhelms fine strands nor looks sparse on thicker hair.
- Maintenance/Longevity: A dependable four-week wear window with consistent nightly wrapping and biweekly root oiling.
- Styling Effort: Salon-only for the base, though the curly ends can be lightly refreshed at home between appointments.
- Salon Script: Ask for: medium feed-in cornrows in a simple grid part, with curly synthetic ends starting at the collarbone.
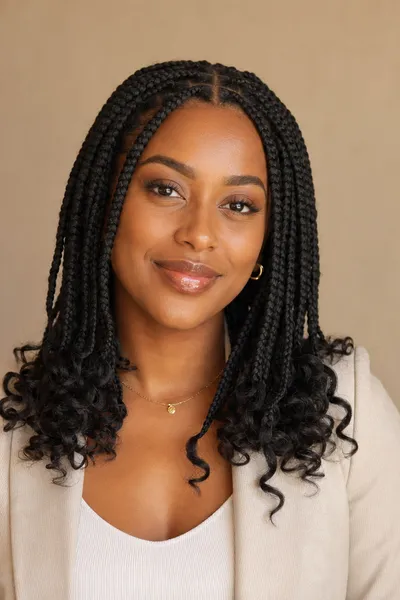
Micro Goddess Braids for a Refined Look
Micro goddess braids use very fine cornrow rows, often a dozen or more across the head, giving a sleek, detailed base that reads as more polished and less bulky than larger sizes. This version takes the longest to install of any style on this list, but the payoff is a refined, almost editorial finish that holds its shape exceptionally well.
- Best For: Round or square faces that benefit from finer detail near the hairline; works best on medium to thick hair since fine sections need enough natural hair to grip.
- Maintenance/Longevity: Often the longest-lasting goddess braid option at five to six weeks, since smaller braids shift and loosen more slowly.
- Styling Effort: Salon-only and a long appointment, frequently five hours or more depending on total hair length.
- Salon Script: Ask for: micro feed-in cornrows, twelve or more rows, with fine curly ends left loose from mid-length down.
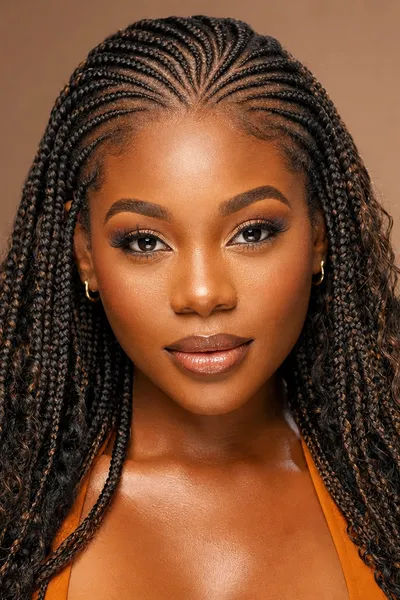
Goddess Braids With Beads
This variation adds decorative beads clipped or threaded onto the cornrow sections, usually near the crown, part lines, or where the braid transitions into loose curls. The beads work particularly well when placed along a single accent row rather than scattered across the whole head, which keeps the look intentional instead of busy.
- Best For: Any face shape; the beads themselves suit thicker hair densities best because heavier hair can support the added weight without pulling at the scalp.
- Maintenance/Longevity: Beads loosen faster than braids do, so plan to re-secure them roughly once a week; overall style holds three to four weeks.
- Styling Effort: Salon-only, with extra time added specifically for threading and securing each bead.
- Salon Script: Ask for: goddess braids with beads placed along the front part line only, secured with a rubber band underneath each bead.
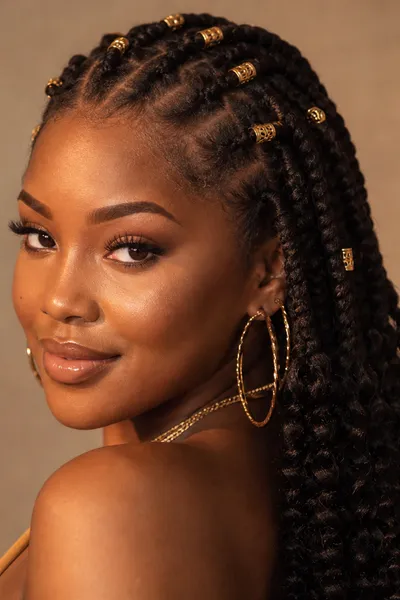
Feed-In Goddess Braids (Cornrow Base)
Feed-in is the technique most goddess braids are built on, where the braider gradually adds small pieces of extension hair into the braid as she works down the row instead of clipping in one large section at the start. The result is a base that lays flatter against the scalp and tapers more naturally at the root, avoiding the bumpy, heavy start of older braiding methods.
- Best For: Fine to medium hair densities, since the gradual feed-in technique reduces tension at the root compared to bulkier methods.
- Maintenance/Longevity: A clean feed-in base tends to hold its shape at the root for the full four-to-five-week wear window.
- Styling Effort: Salon-only; this is a technique request rather than a standalone style, so pair it with any braid size above.
- Salon Script: Ask for: feed-in technique specifically, not a clipped-in base, so the roots lay flat and taper naturally.
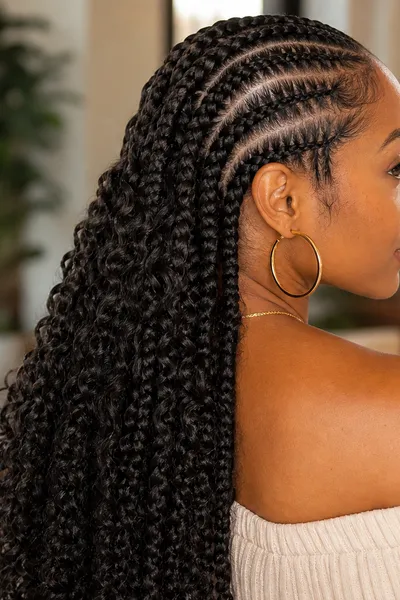
Stitch Goddess Braids
Stitch braids create a raised, corded texture along the top of each cornrow, almost like a visible seam running down the part, which gives the base a more sculptural look than a standard flat feed-in. This texture makes the parting pattern itself part of the design, so stitch goddess braids are often chosen for their part shapes, whether straight, curved, or zigzagged.
- Best For: Faces that benefit from strong vertical lines, like rounder or wider face shapes; works well on medium to thick hair that can hold the raised texture cleanly.
- Maintenance/Longevity: Similar to classic goddess braids at three to five weeks, though the raised stitching may soften slightly faster near the crown.
- Styling Effort: Salon-only and requires a more experienced braider, since the stitching technique takes practice to execute evenly.
- Salon Script: Ask for: stitch cornrows with a raised center seam, curly ends left loose from mid-shaft.
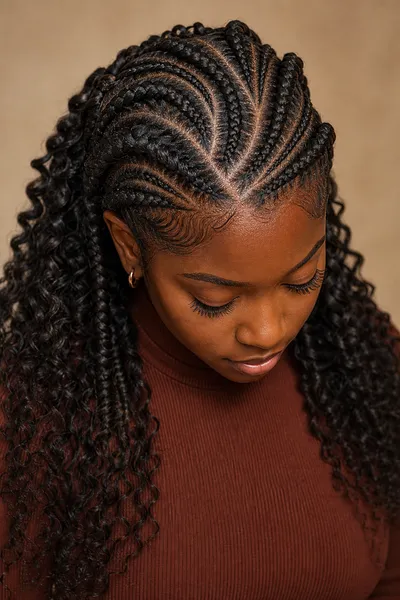
Goddess Box Braids
Goddess box braids swap the fully-braided box braid tip for the same loose, curly ending this style is known for, while keeping the individual box-shaped parting pattern instead of connected cornrow rows. Because each braid is its own separate section, this style tends to move more freely and feel lighter on the head. If you love the structure of box braid styles but want a softer ending, this is the version to ask for.
- Best For: Long or oval faces that suit individual, freely-moving braids; works across most hair densities since box parting is more forgiving on fine hair.
- Maintenance/Longevity: Holds around four weeks, though individual braids may need occasional re-twisting at the root as new growth comes in.
- Styling Effort: Salon-only, and typically a longer appointment than cornrow-based goddess braids since each section is parted and braided individually.
- Salon Script: Ask for: individual box parts, medium size, braided down to mid-shaft with curly synthetic hair released at the ends.
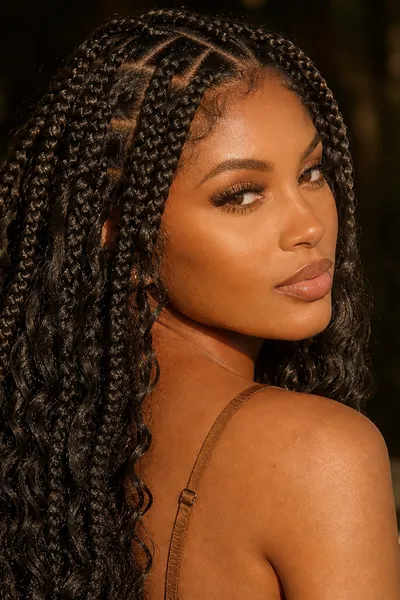
Knotless Goddess Braids
Knotless goddess braids combine the gentler, knot-free starting technique of knotless braids with the loose curly finish of a goddess style, giving you a base that lies flatter at the root with noticeably less tension on the hairline. If you have tried knotless braids before and loved how they felt on day one, this version lets you keep that comfort while adding the softer, curlier ending.
- Best For: Fine hair and sensitive hairlines especially, since the knotless start reduces pulling right where tension is most noticeable.
- Maintenance/Longevity: Four to five weeks, with less scalp tenderness reported in the first few days compared to knotted feed-in styles.
- Styling Effort: Salon-only and takes slightly longer than a standard feed-in because of the knotless starting method.
- Salon Script: Ask for: knotless feed-in technique with curly ends left loose from mid-shaft, no rubber band knots at the root.
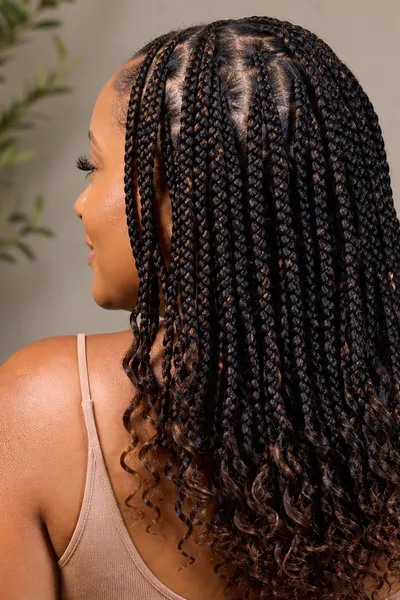
Goddess Locs (Faux Locs Braid Style)
Goddess locs wrap the cornrow or individual braid base in a distressed, loc-textured extension hair instead of a smooth kanekalon strand, then release into loose curly ends the same way a standard goddess braid does. The finished look reads more textured and bohemian, since the loc wrap has visible ridges and a slightly rougher surface.
- Best For: Round, oval, and heart-shaped faces; the textured wrap works well across hair densities, though thicker natural hair tends to anchor the heavier loc extensions more comfortably.
- Maintenance/Longevity: Holds particularly well at five to six weeks since the wrapped texture disguises new growth better than smooth braids do.
- Styling Effort: Salon-only and a longer appointment due to the extra wrapping step around each section.
- Salon Script: Ask for: faux loc wraps over a cornrow base, medium size, with curly ends left loose from mid-length.
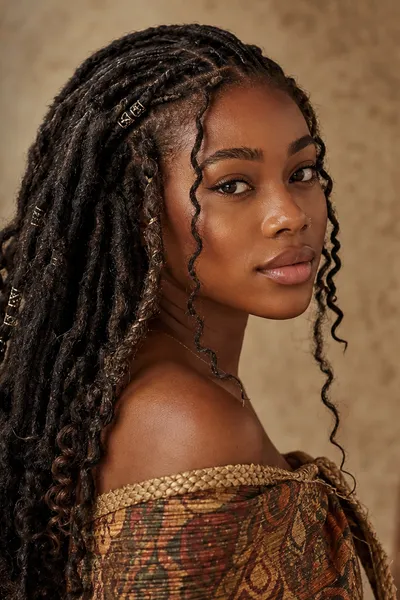
Side-Swept Goddess Braids
Instead of the standard back-facing parting pattern, side-swept goddess braids use a deep side part that pulls the majority of the cornrows to one side of the head before they flow into loose curls near the shoulder. This asymmetry gives the style a softer, more feminine framing around the face than a symmetrical straight-back look.
- Best For: Square and rectangular face shapes that benefit from asymmetry breaking up strong jaw angles; suits medium to thick hair since the deep side part needs enough density to look intentional.
- Maintenance/Longevity: Holds the same three-to-five-week window as classic goddess braids, though the deep side part may need occasional re-parting as new growth shifts the line.
- Styling Effort: Salon-only for the initial part; restyling the sweep at home afterward is simple and quick.
- Salon Script: Ask for: a deep side part with all cornrows swept to one side, curly ends released at the shoulder.
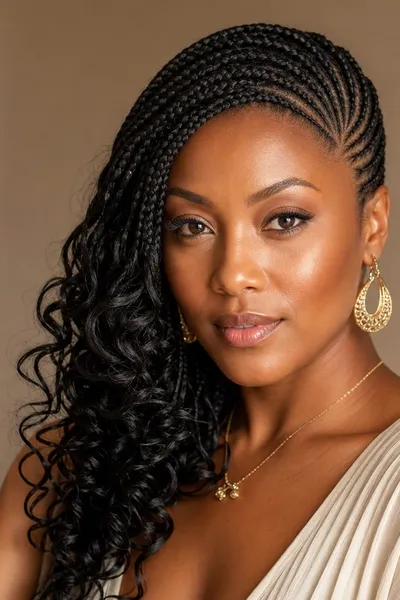
Goddess Braids With a Zigzag Part
A zigzag part turns the parting pattern itself into a design feature, replacing straight rows with an angular, lightning-bolt-style line before each cornrow branches off. It takes a more skilled braider to execute cleanly, since the zigzag has to stay symmetrical across the whole head, but the payoff is a base that looks intricate even before the curly ends are added.
- Best For: Oval and heart-shaped faces since the angular lines draw the eye upward and outward; works on most densities, though visible parting shows more clearly on lighter hair colors against darker scalps.
- Maintenance/Longevity: Three to five weeks; the zigzag line tends to blur slightly faster than a straight part as new growth comes in.
- Styling Effort: Salon-only and requires a braider experienced specifically with angular parting.
- Salon Script: Ask for: a zigzag part across the whole head, medium cornrows, curly ends left loose from mid-shaft.
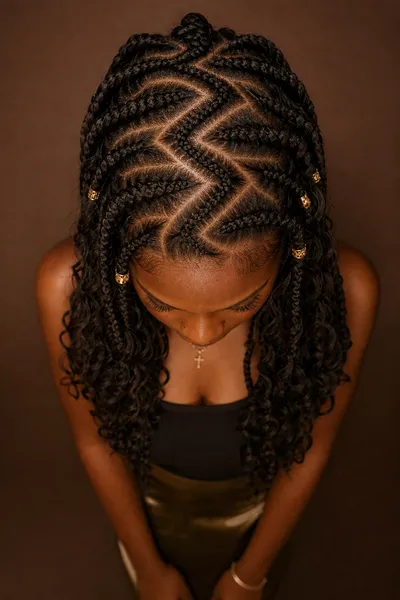
Half-Up Goddess Braids
This style keeps the full braid install but pulls the top section up and back into a clip, tie, or small knot, leaving the lower half of the braids and curly ends hanging loose. It is a styling choice you can make on any braid base already in place, making it one of the easiest entries on this list to try without any extra salon time.
- Best For: Any face shape, since pulling the crown up softens whichever features you want to highlight; works on any hair density already installed with goddess braids.
- Maintenance/Longevity: No additional wear impact; this is a daily styling choice rather than an installation variable.
- Styling Effort: Fully DIY-friendly and takes under five minutes to put up once the braids are already installed.
- Salon Script: No salon request needed; this is a home styling method, not an installation request.
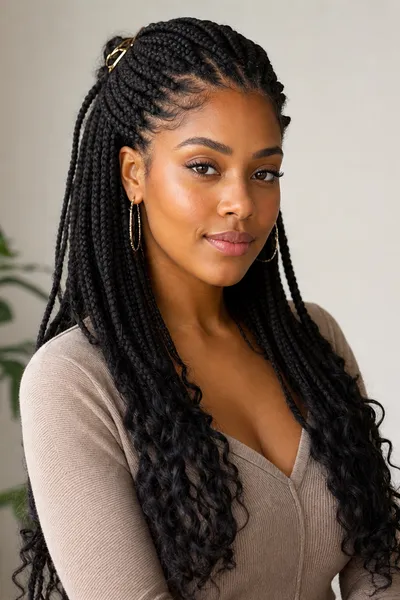
Goddess Braids Updo Bun
For a fully pulled-back look, all of the braids and curly ends are gathered at the crown or nape and secured into a low or high bun, hiding the loose ends inside the wrapped shape rather than letting them hang free. This version reads more formal than a down style, and it takes pressure off the ends since they are tucked and secured rather than swinging loose.
- Best For: Oval and round faces especially, since pulling everything back and up elongates the face; suits any hair density already in goddess braids.
- Maintenance/Longevity: No installation change; wrapping the bun in a satin scarf overnight helps it hold shape for repeat wear across several days.
- Styling Effort: DIY-friendly and takes about ten minutes with bobby pins and a stretchy hair tie.
- Salon Script: No salon request needed; ask your braider only if you want slightly longer curly ends specifically to have more length to work with in a bun.
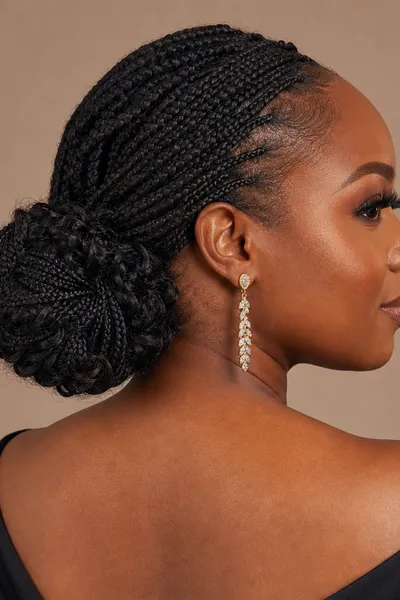
Goddess Braids Ponytail
Gathering all of the braids into a single high or low ponytail creates a sleek, uniform silhouette where the curly ends cascade down from one central point instead of framing the whole head. This is a good option for warmer months since pulling everything back off the neck reduces how much the loose curls interact with sweat and humidity throughout the day.
- Best For: Any face shape; a high ponytail placement suits rounder faces by adding vertical lift, while a low placement suits longer faces by keeping visual weight closer to the jaw.
- Maintenance/Longevity: No installation change; securing at the same spot daily can create slight tension over time, so vary the ponytail height every few days.
- Styling Effort: DIY-friendly and takes just a few minutes with a smooth hair tie or wrap of extra braiding hair to conceal the elastic.
- Salon Script: No salon request needed; this is a post-install styling choice rather than a braiding technique.
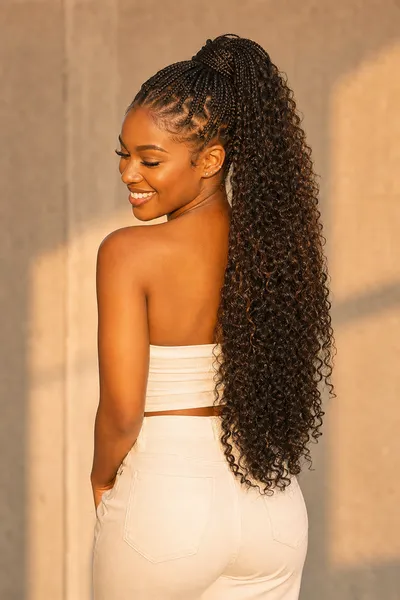
Boho Goddess Braids With Loose Curls
The boho version leans further into texture by leaving noticeably more hair loose around the crown and hairline before the cornrows even begin, creating soft face-framing pieces that blend with the curly ends lower down. This mix of braided structure and unbraided natural hair up top gives a more undone, festival-ready look than a standard goddess braid with a full hairline.
- Best For: Square and angular face shapes since the loose face-framing pieces soften strong jawlines; works especially well on wavy or curly natural hair textures that blend seamlessly with the loose pieces.
- Maintenance/Longevity: Slightly shorter wear window at two to three weeks, since the loose face-framing sections see more daily manipulation than a fully braided hairline.
- Styling Effort: Salon-only for the initial parting, though the loose pieces can be restyled at home daily with a light curl cream.
- Salon Script: Ask for: goddess braids with loose face-framing pieces left out at the hairline, curly ends released from mid-shaft.
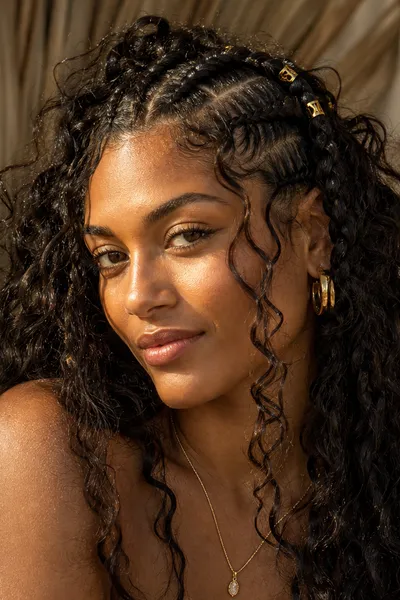
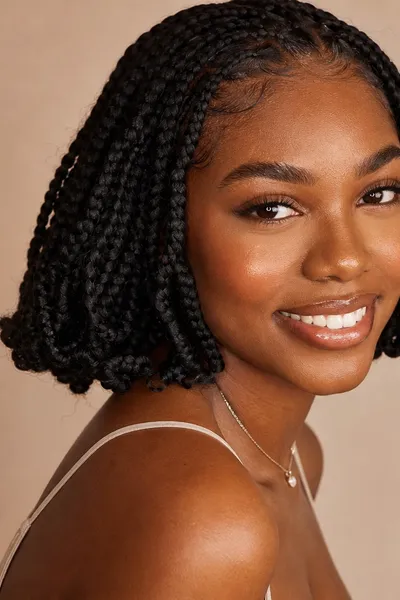
Short Goddess Braids (Bob Length)
Short goddess braids stop at chin or collarbone length, giving a compact, bob-shaped silhouette that keeps all the visual interest of the style without the added weight or install time of longer versions. This length is often underrepresented in goddess braid galleries even though it suits a huge range of readers, particularly anyone managing a shorter natural hair length underneath.
- Best For: Round and oval faces especially, since the shorter length keeps focus near the jaw and chin rather than adding length below it; works well on fine hair since less total extension hair is needed.
- Maintenance/Longevity: Typically the fastest-drying and easiest-to-maintain length at three to four weeks, since there is simply less hair to manage daily.
- Styling Effort: Salon-only, but a meaningfully shorter appointment than any longer goddess braid style on this list.
- Salon Script: Ask for: bob-length goddess braids, chin to collarbone, with curly ends released from just below the jaw.
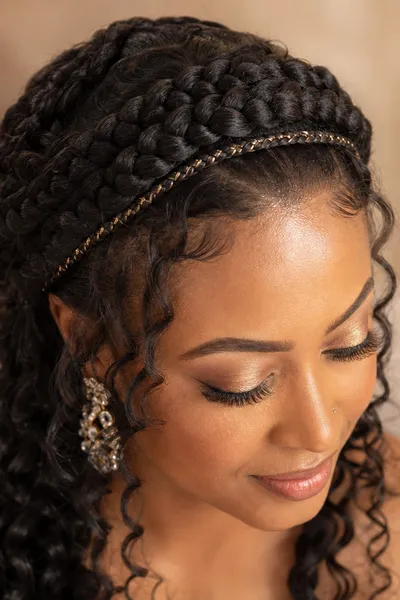
Goddess Braids With a Halo Accent
This variation wraps one or two thin braids up and over the crown like a halo, either from the front hairline or from a side section, while the rest of the head wears standard goddess braids with loose curly ends. The halo section adds a delicate, almost bridal detail without requiring a completely different technique underneath.
- Best For: Oval and heart-shaped faces that benefit from a soft accent near the crown; works on most densities, though a slightly thicker halo section shows up more clearly in photos.
- Maintenance/Longevity: The halo braid itself may loosen slightly faster than the rest of the install since it sees more friction from hats and accessories, so expect to re-secure it around week two.
- Styling Effort: Salon-only for the initial halo section; restyling it flatter or looser afterward is simple at home.
- Salon Script: Ask for: one thin halo braid wrapped from the front hairline around the crown, in addition to the main goddess braid base.
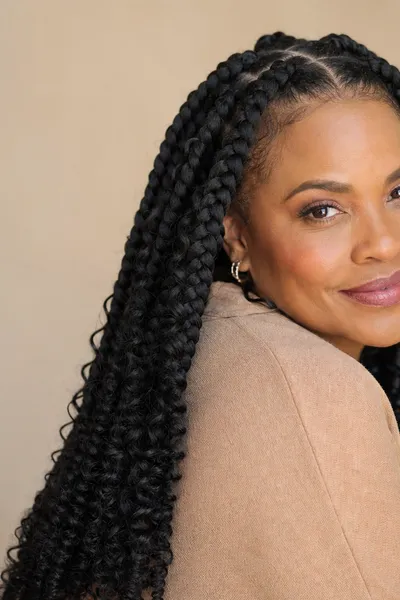
Goddess Braids for Fine or Low-Density Hair
Fine and low-density hair can wear goddess braids well, but the technique needs to shift slightly to avoid visible gaps or excess tension on delicate strands. Braiders typically use jumbo or medium sections instead of micro braids, since larger sections need less natural hair per row to look full, and often add slightly more curly extension hair at the ends to create volume the natural hair cannot provide on its own.
- Best For: Any face shape; specifically suited to fine, low-density, or thinning natural hair textures that need a size adjustment rather than a different style altogether.
- Maintenance/Longevity: Slightly shorter wear window at two to three weeks, since fine hair holds braid tension less securely than medium or thick strands over time.
- Styling Effort: Salon-only, and worth specifically requesting a braider experienced with fine hair, since incorrect sizing is the most common cause of a disappointing result.
- Salon Script: Ask for: jumbo or medium feed-in cornrows sized for fine hair, with extra curly extension hair added at the ends for volume, and the braids installed with light tension only.
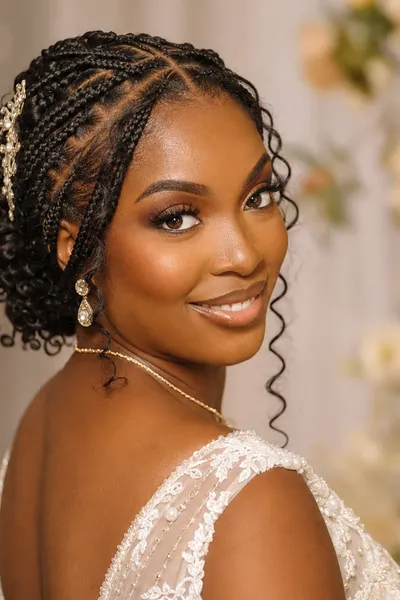
Goddess Braids for Weddings and Formal Events
The formal version usually combines several elements already covered on this list: a clean, symmetrical part, an updo or half-up styling choice, and occasionally a halo accent or beads for added shine. What separates it from an everyday goddess braid is styling intention rather than a different installation technique, so it is worth booking the install a few days before the event to let the curly ends settle into their most natural-looking shape.
- Best For: Any face shape and hair density; the formal styling choice matters more here than the underlying braid size, so pick a base style from earlier in this list first.
- Maintenance/Longevity: Book the install three to five days before the event so the curls relax slightly and the parts settle, rather than same-day when everything looks freshly tight.
- Styling Effort: Salon-only for the base install, with a separate shorter appointment or at-home styling session for the event-day updo or half-up look.
- Salon Script: Ask for: [your chosen goddess braid size] with curly ends long enough to style into an updo, plus a few extra strands left loose at the temples for face-framing.
Ways to Wear Your Goddess Braids
Ways to Wear Your Goddess Braids
Once your goddess braids are installed, the same base can carry you through weeks of completely different looks without a single redo. A low bun, a sleek high ponytail, or a simple half-up clip all work on the exact same install, giving you several distinct styles out of one salon appointment.
Dressing the same install up or down mostly comes down to accessories rather than the braids themselves. For work, a simple satin headband or a neat half-up clip keeps things polished, while a night out calls for gold cuffs threaded onto a few strands or a deep side part swept dramatically to one shoulder. Formal events benefit from combining a few of these elements at once, like a halo section paired with hair jewelry along the crown.
Humidity and sweat deserve their own mention, since the curly ends are the part of the style most affected by summer heat. Pineappling the curls loosely on top of the head overnight helps the loose ends hold their shape better than sleeping on them flat, and a light anti-humidity product smoothed only over the curly sections helps the ends resist frizzing when temperatures and moisture climb.
Goddess Braids FAQs
Goddess Braids FAQs
How long do goddess braids last? Most goddess braid installs hold up well for three to five weeks, though smaller braid sizes and consistent nighttime wrapping can push that closer to six weeks. Larger, jumbo styles tend to loosen a bit sooner simply because there is more bulk shifting with daily movement.
Can I wash my hair with goddess braids in? Yes, though it takes a gentler approach than washing loose hair. Diluting shampoo in a bottle and applying it directly to the scalp in sections, then rinsing thoroughly and allowing the braids to air dry completely, helps avoid the mildew smell and slow drying time that come from soaking the style too aggressively.
Do goddess braids damage natural hair? Goddess braids themselves are not inherently damaging when installed correctly with reasonable tension. The real risk comes from braids installed too tightly at the scalp, which the American Academy of Dermatology has linked to traction alopecia, a type of hair loss caused by sustained pulling at the follicle. If a braid feels painfully tight at the root, ask your braider to loosen and redo that section immediately.
What is the difference between goddess braids and knotless braids? Goddess braids are defined by their loose, curly ends left out partway down each braid, while knotless braids are defined by their gentler starting technique that avoids the small knot traditionally used to attach extension hair at the root. Many braiders now offer knotless goddess braids that combine both benefits in a single install.
Can goddess braids work on fine or thin hair? Yes, with a few adjustments. Braiders typically move to jumbo or medium braid sizes instead of micro sizes for fine or low-density hair, since larger sections require less natural hair per row and add volume through the extension hair itself. Requesting light tension and a braider experienced with fine hair will help you avoid the gaps or scalp strain that sometimes happen otherwise.
Goddess braids earn their reputation because they do double duty: full protective wear for weeks at a time, paired with a soft, curly finish that still feels dressed up on a Tuesday. Pick the entry above that matches your face shape, hair density, and how much time you have for maintenance, then screenshot its Salon Script line before your appointment. Pin your favorite from this list, and if you want to keep the curls looking fresh well into week three, take a look at those braid care products before you go.

Your email address will not be published. Required fields are marked *