Soft curls and delicate half-up styles have their moment, but they are not the only way to walk into prom. These bold prom updos are built for the girl who wants her hair to command the room the second she steps through the door, with sculptural shapes, sleek lines, and serious height that photograph just as well at 1 a.m. as they do at 7 p.m. If you already scrolled through every soft, romantic roundup and thought "where is the drama," this list is for you.
Every style below comes with the practical details competitors skip: who it actually flatters, how long it takes, the exact words to hand your stylist, which accessories and dress necklines pair with it, and how to keep it standing through hours of dancing. If you decide midway through that you want something softer after all, our prom braided updos roundup has eleven romantic options waiting. But if you are here for statement-making, structured, editorial-level hair, keep scrolling. That combination of practical detail and drama is what makes these bold prom updos genuinely wearable instead of just pretty inspiration photos.
How to Choose Your Bold Prom Updo
How to Choose Your Bold Prom Updo
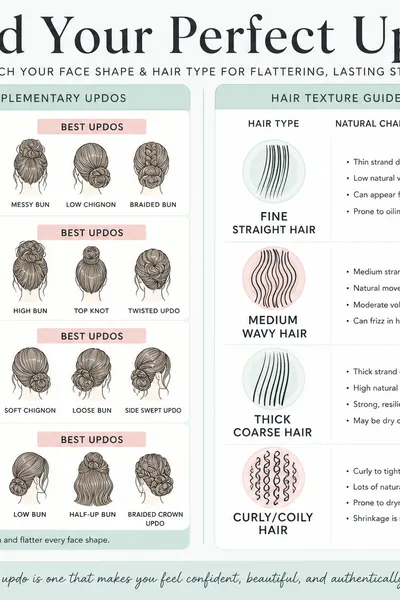
Before you commit, think about your face shape and hair texture — a style that suits an oval face and thick hair can look totally different on fine strands or a heart-shaped face. Sharp geometric buns and sleek ponytails flatter round and oval faces by adding definition without extra width, while square and heart shapes look best with crown volume rather than width at the temples. These are starting points, not rules, so trust your stylist's eye, and our face shape guide can help you go deeper first.
Fine hair usually needs backcombing, teasing, or clip-in extensions to hold sculptural shapes past a few hours, while thick or coarse hair holds structure longer but may need smoothing product to tame flyaways. Shoulder-length hair can still pull off a faux bun or wrapped style with a little extra length from extensions. Some looks are genuinely DIY-friendly with a round brush and strong-hold gel, while others need a stylist's hands and thirty to sixty-plus minutes in the chair, so flag your favorites early and mention the time commitment when you book.
20 Bold, Dramatic Prom Updos to Try This Season
20 Bold, Dramatic Prom Updos to Try This Season
Each style below includes who it suits, how long it takes, exactly what to tell your stylist, how to accessorize it, and how to keep it locked in place for the whole night. That mix of details is what separates real bold prom updos from a simple photo gallery. Save your top two or three before you go any further.
1. Sculptural High Bun with a Sharp Center Part
This look takes a classic high bun and sharpens it with a razor-straight center part and a smooth, glass-like base with zero bumps. It suits oval and round faces best, since the vertical line at the part elongates the face, and it works beautifully on medium to thick hair that holds a sleek base without a lot of extra product. Fine hair can still get this look with a strong gel and a fine-tooth comb for precision at the part.
- Styling time: Salon-recommended, 30 to 45 minutes for a truly sharp, bump-free finish.
- Ask your stylist for: "A sculpted high bun with a razor-sharp center part and a glass-smooth base, no bumps at the crown."
- Accessory and dress pairing: A single oversized metal cuff wrapped around the base of the bun, paired with a halter or cutout gown that keeps the neckline uncluttered.
- All-night hold tip: Cross two bobby pins in an X pattern at the base of the bun before wrapping any remaining hair around it, then set with a flexible-hold finishing spray.
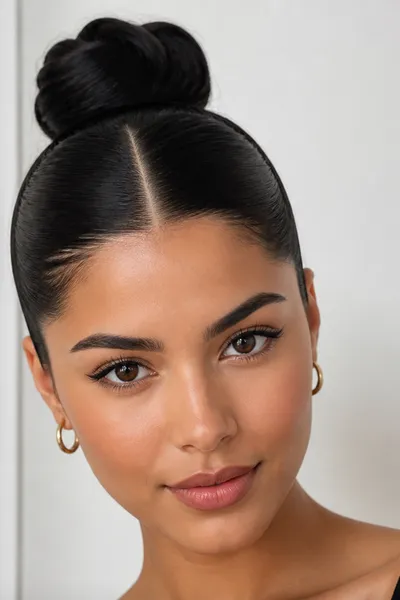
2. Twisted Faux Hawk Updo
Sections of hair are twisted from the temples up toward the crown and pinned into a raised ridge down the center of the head, mimicking the shape of a mohawk without shaving anything. It is a strong pick for square or heart-shaped faces because the height builds straight up rather than out, and it works best on medium to long hair with some texture to grip the twists, making it one of the more approachable edgy prom hairstyles for a first attempt. Very fine or very slippery hair may need a texturizing spray first so the twists hold their shape.
- Styling time: DIY-friendly with practice, about 20 to 30 minutes once you know your twist pattern.
- Ask your stylist for: "A twisted faux hawk with the twists pinned tight against the scalp and extra height built at the crown."
- Accessory and dress pairing: A row of small statement pins running along the twisted ridge, paired with a plunge or open-back dress that shows off the exposed nape.
- All-night hold tip: Pin each twist section individually rather than pinning the whole row at once, which keeps any single loose twist from unraveling the entire style.
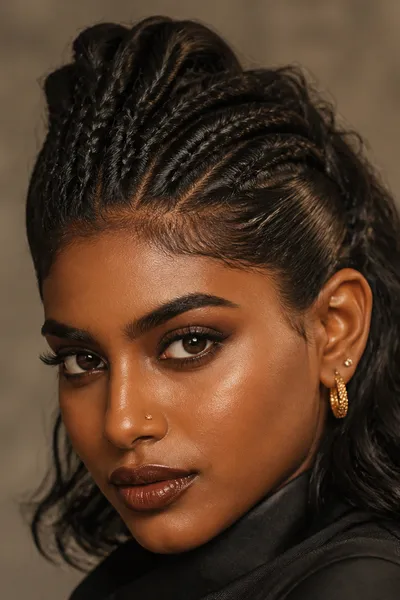
3. Sleek Architectural Ponytail with a Wrapped Base
This is a high, glass-smooth ponytail with a section of hair wrapped fully around the base to hide the elastic, giving it a polished, almost sculptural look instead of a casual gym-ponytail feel. It flatters nearly every face shape when placed at the crown, but it is especially striking on oval and long faces where the vertical line adds drama without adding length, making it one of the cleaner sleek prom updos on this list. Straight to slightly wavy hair holds the smoothest base, while curly hair will need a flat iron pass or strong smoothing cream first.
- Styling time: DIY-friendly, 15 to 25 minutes with a good boar-bristle brush for smoothing.
- Ask your stylist for: "A high, sleek ponytail with the base wrapped in hair, not an elastic showing, and extra polish at the crown."
- Accessory and dress pairing: A metallic hair cuff slid over the ponytail an inch below the wrap, paired with a strapless or one-shoulder gown that keeps the focus up top.
- All-night hold tip: Anchor the ponytail base with two bobby pins crossed underneath before wrapping the hair section over them, then finish with an anti-humidity spray.
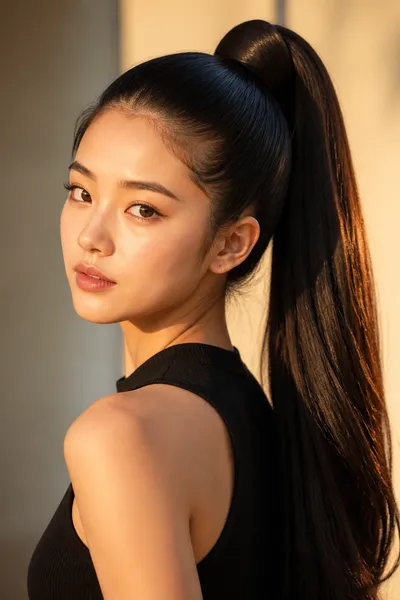
4. Dramatic Braided Crown with Added Height
A halo braid gets pushed into bold territory here by backcombing the crown section before the braid is laid, so the finished ring of hair sits noticeably higher and fuller than a standard halo braid. It works well on round and oval faces and needs at least medium-length hair, since shorter lengths may show gaps in the crown. Thick, coarse hair holds the added height without much extra product, while fine hair benefits from a volumizing mousse before backcombing.
- Styling time: Salon-recommended, 40 to 60 minutes for clean, even braiding around the whole head.
- Ask your stylist for: "A halo braid with the crown backcombed for height before you braid, not a flat braid laid straight onto the scalp."
- Accessory and dress pairing: Two or three sculptural metal hairpins tucked into the braid at even intervals, paired with a fitted mermaid gown that lets the braided crown be the statement.
- All-night hold tip: Spray each section with a strong-hold spray before braiding, not just after, so the structure holds from the inside out.
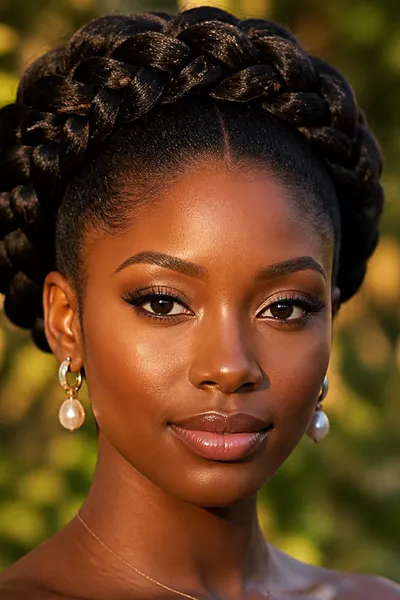
5. Wet-Look Slicked-Back Bun
Every strand is smoothed straight back with a strong gel and pulled into a low, tight bun, giving the entire head a glossy, wet-look finish with no baby hairs or flyaways in sight. It is a favorite for oval and heart-shaped faces because the pulled-back effect opens up the whole face, and it works on any hair length as long as the hair is at least shoulder-length to reach the bun. Very fine hair may need a light layer of gel first, then a heavier top coat to avoid product buildup near the scalp.
- Styling time: DIY-friendly, 15 to 20 minutes with a strong-hold gel and an edge brush.
- Ask your stylist for: "A fully slicked-back, wet-look bun with no part, smoothed with gel rather than teased for volume."
- Accessory and dress pairing: A thin metallic headband pressed flat against the slicked hairline, paired with a plunge-back or backless dress that mirrors the sleek, minimal vibe.
- All-night hold tip: Set the entire slicked section with a light mist of hairspray before pulling it into the bun, which locks the smoothness in place before humidity gets a chance to lift it.
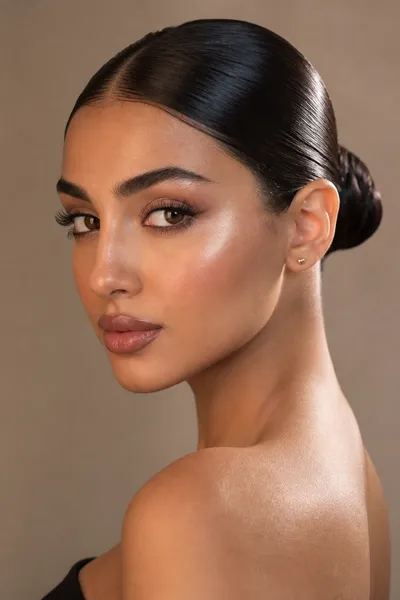
6. Voluminous Bubble Ponytail
This style takes a single ponytail and sections it into two or three "bubbles" using small elastics spaced a few inches apart, then pulls each section outward to create rounded volume between each band. It suits most face shapes and looks especially fun on long, thick hair, though clip-in extensions can help fine or shorter hair achieve the same full, rounded bubbles, which makes it one of the more forgiving voluminous prom updo styles for beginners. The overall effect reads as playful but still structured, which keeps it firmly in bold territory rather than soft and romantic.
- Styling time: DIY-friendly, 20 to 30 minutes once you get the spacing of the elastics right.
- Ask your stylist for: "A bubble ponytail with three even sections and extra volume pulled out at each bubble, not a flat, tight ponytail."
- Accessory and dress pairing: A slim chain wrapped around the topmost elastic band, paired with a fitted column dress that lets the ponytail's movement stand out against a simple silhouette.
- All-night hold tip: Use small, clear elastics rather than large scrunchies so the bubbles keep their shape, and spritz each section lightly before pulling it outward.
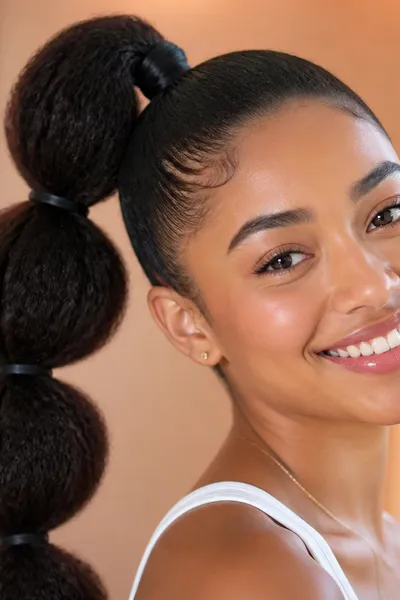
7. Asymmetrical Side-Swept Updo
Instead of a centered, symmetrical shape, all the volume and structure in this updo sits to one side, creating a dramatic, off-kilter silhouette that reads as high fashion rather than classic. It flatters oval and long faces particularly well, and it works on medium to long hair with enough length to sweep fully to one side without looking sparse. Curly and wavy textures have an advantage here, since the natural movement adds extra dimension to the asymmetry.
- Styling time: Salon-recommended, 30 to 45 minutes to balance the asymmetry so it looks intentional rather than uneven.
- Ask your stylist for: "An asymmetrical updo with all the volume swept to one side and the opposite side kept sleek and close to the head."
- Accessory and dress pairing: A single oversized sculptural comb placed at the point where the hair sweeps, paired with a one-shoulder or asymmetrical-hem dress that echoes the off-center line.
- All-night hold tip: Pin the swept side more heavily than the sleek side, since it carries more weight and volume and needs the extra support to survive hours of movement.
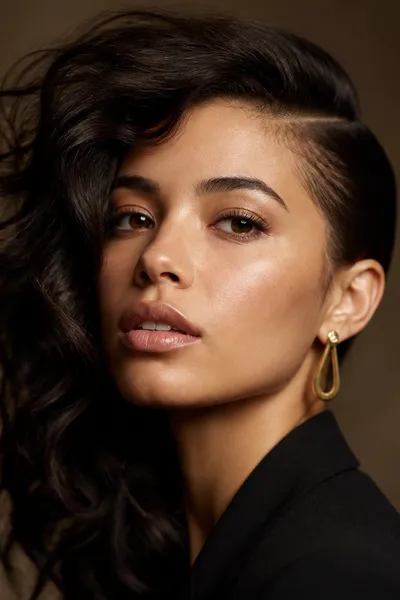
8. Textured Top Knot with Face-Framing Points
A high top knot gets a modern, editorial edge here through deliberately textured, slightly undone strands at the base and two sharp, sculpted points of hair framing the face instead of soft wisps. It suits square and round faces especially well, since the face-framing points create a slimming line along the jaw. Thick, coarse, or curly hair naturally gives the most texture to this style, while straight hair may need a texturizing spray or a loose curl set first.
- Styling time: DIY-friendly with practice, 20 to 30 minutes.
- Ask your stylist for: "A textured top knot with visible texture at the base, not smooth, and two sharp face-framing pieces pulled forward."
- Accessory and dress pairing: A small cluster of metal pins at the base of the knot, paired with a square-neck or high-neck dress that lets the face-framing points do the work.
- All-night hold tip: Use a texturizing spray rather than a smoothing cream on the base of the knot, since smoothing products can make texture slip loose faster.
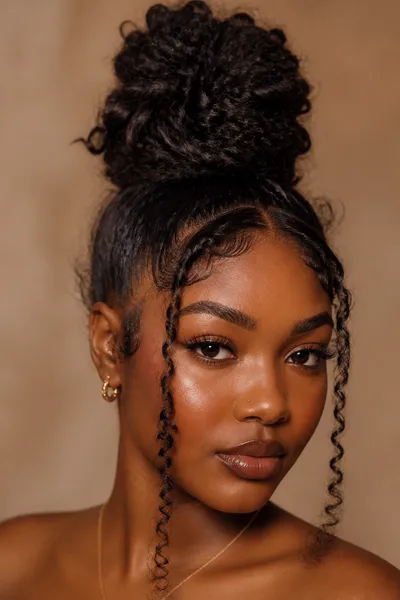
9. Metallic Cuff-Wrapped Low Bun
A simple, sleek low bun becomes a statement piece here through a large metallic cuff wrapped fully around the outside of the bun, turning a classic shape into something noticeably more editorial. It works on nearly every face shape, since the low placement is universally flattering, and it is best suited to medium to thick hair that gives the bun enough volume to fill out the cuff. Fine hair can still pull this off with a bit of backcombing at the crown before pulling everything back.
- Styling time: DIY-friendly, 15 to 20 minutes.
- Ask your stylist for: "A low, smooth bun with extra volume at the crown so a hair cuff has enough hair to wrap around."
- Accessory and dress pairing: The metallic cuff itself is the statement accessory here, so pair it with a plunge or open-back dress that shows off the low placement at the nape.
- All-night hold tip: Secure the bun fully with pins before sliding the cuff over it, since the cuff should sit as decoration rather than doing any of the actual holding.
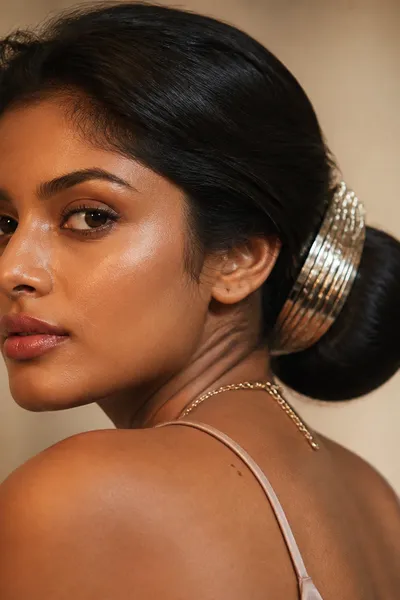
10. Statement-Pin Sculpted Chignon
This is a classic sculpted chignon at the nape of the neck, elevated with three or four oversized statement pins arranged in a deliberate pattern rather than scattered randomly. It flatters oval and heart-shaped faces beautifully, and it suits medium to long hair since a chignon needs enough length to coil neatly. Thinner hair can be boosted with a small hairpiece or a few clip-in wefts tucked underneath before the chignon is shaped.
- Styling time: Salon-recommended, 30 to 40 minutes for a smooth, well-shaped coil.
- Ask your stylist for: "A sculpted chignon at the nape with room left for statement pins, not tucked so tight there's nowhere to place them."
- Accessory and dress pairing: Three matching oversized pins arranged in a diagonal line across the chignon, paired with a plunge-back gown that frames the nape.
- All-night hold tip: Pin the chignon's structure first with regular bobby pins hidden inside the coil, then add the statement pins on top purely for decoration so they never bear the weight.
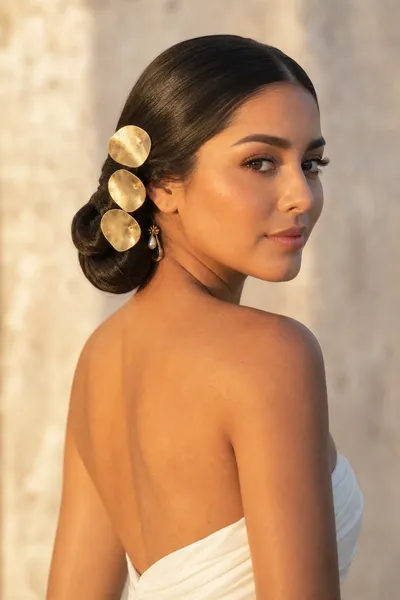
11. High Twisted Space Bun Duo
Two twisted buns sit high on the crown, each one built from a twisted section rather than a simple wrapped ponytail, giving the classic space-bun shape a more sculptural, grown-up finish. It works well on round and square faces because the height and symmetry balance wider features, and it suits medium to long hair with enough length to twist fully before wrapping into each bun. Curly hair adds great texture to the twists, while fine hair may need a texturizing spray for grip.
- Styling time: DIY-friendly with practice, 25 to 35 minutes to keep both buns even.
- Ask your stylist for: "Twisted space buns, not simple wrapped buns, placed symmetrically high on the crown."
- Accessory and dress pairing: A single sculptural pin in each bun, paired with a halter or high-neck dress that keeps the visual weight up top.
- All-night hold tip: Twist each section tightly before wrapping, since a loose twist is the most common reason space buns unravel by the end of the night.
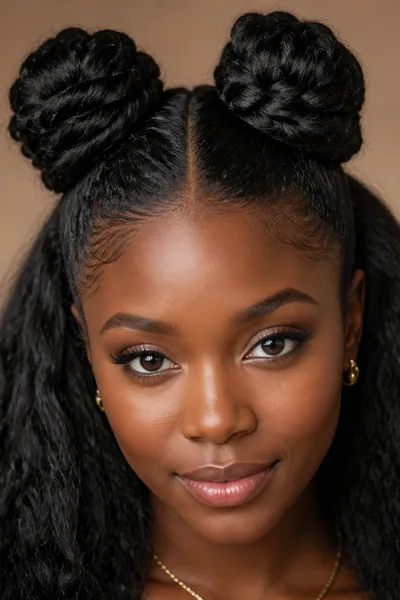
12. Braided Mohawk Updo
Small braids are worked from both sides of the head toward the center, then pinned upward to create a raised, braided ridge that reads as a mohawk without cutting or shaving any hair. It is a strong choice for square and heart-shaped faces since the vertical height balances wider jawlines, and it needs at least medium-length hair to create enough braids for a full ridge. Thick and coarse textures give this style the fullest, most defined look.
- Styling time: Salon-recommended, 45 to 60 minutes for multiple clean braids and precise pinning.
- Ask your stylist for: "Small braids from both sides pinned up into a raised center ridge, like a braided mohawk, not a flat braided updo."
- Accessory and dress pairing: A line of small metal cuffs threaded onto a few of the braids before pinning, paired with an edgy cutout or asymmetrical dress.
- All-night hold tip: Pin the ridge in sections rather than all at once, and check the tightest points near the crown midway through the night if you have time.
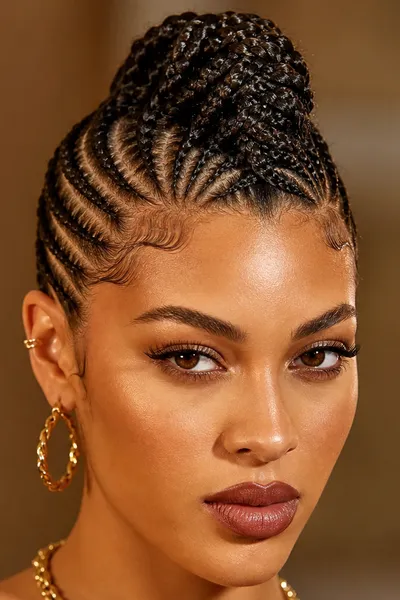
13. Sleek Low Bun with Exaggerated Crown Volume
This look pairs a smooth, low bun at the nape with dramatically teased, lifted volume at the crown, creating a striking contrast between sleek and sculptural in the same style. It suits nearly every face shape thanks to the balance between the two elements, and it works best on medium to thick hair that holds the crown's lift through the night. Fine hair absolutely can do this look, but it will need backcombing or a bump-it style insert to hold the crown volume.
- Styling time: Salon-recommended, 30 to 45 minutes to get the volume-to-sleekness ratio right.
- Ask your stylist for: "A low, smooth bun with dramatic teased volume built at the crown, not an even amount of volume all over."
- Accessory and dress pairing: A single sculptural comb placed just behind the crown volume, paired with a fitted gown with a plunge back to show off the sleek nape.
- All-night hold tip: Set the teased crown with a strong-hold spray before smoothing the low sections, so you lock in height first and polish second.
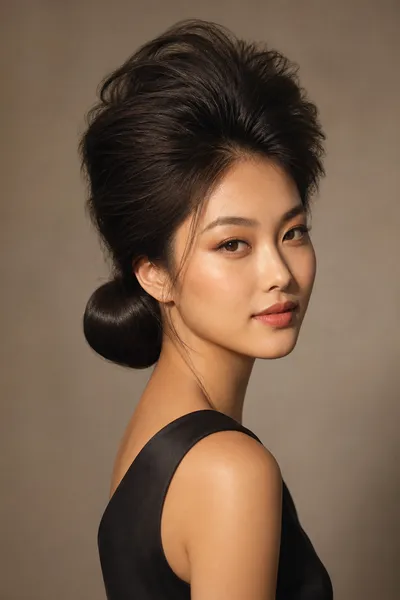
14. Editorial Finger-Wave Updo
Deep, sculpted finger waves are set close to the head and swept upward into a pinned updo, giving the finished look a vintage-meets-runway edge rather than a soft, romantic curl pattern. It flatters oval and round faces especially well, and it is most achievable on medium-length, straight to slightly wavy hair, since very curly textures can be flattened with a flat iron first if you want this exact look. This is one of the more technical, high fashion prom updos on this list, so practice matters if attempting it at home.
- Styling time: Salon-recommended, 45 to 60 minutes for precise, symmetrical waves.
- Ask your stylist for: "Deep, defined finger waves set close to the scalp and swept up into a pinned updo, not loose glam waves."
- Accessory and dress pairing: A single vintage-inspired metal hairpin at the point where the waves meet the updo, paired with a sleek column or bias-cut gown.
- All-night hold tip: Set every wave with a strong-hold gel and let it dry fully under a hood dryer or with a diffuser before pinning, since waves that are still damp will lose their shape fast.
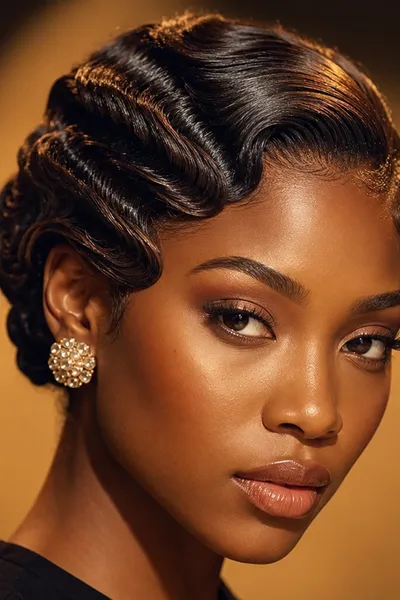
15. Structured Halo Braid with Height
Unlike a soft, flat halo braid, this version is deliberately backcombed and pinned at an angle so the braid sits higher on one side, giving the whole look a more architectural, asymmetrical feel. It works well on oval and long faces, and it needs medium to long hair for a braid that wraps fully around the head. Thick, coarse hair holds the raised angle with less product, while fine hair benefits from a light backcombing pass before the braid is placed.
- Styling time: Salon-recommended, 40 to 55 minutes for the angled placement and pinning.
- Ask your stylist for: "A halo braid pinned at a higher angle on one side, with the crown backcombed first for structure, not laid flat."
- Accessory and dress pairing: A scattering of small metal pins along the higher side of the braid, paired with a fitted gown with a high or halter neckline.
- All-night hold tip: Pin the angled section more heavily than the rest of the braid, since gravity will pull on the raised side first.
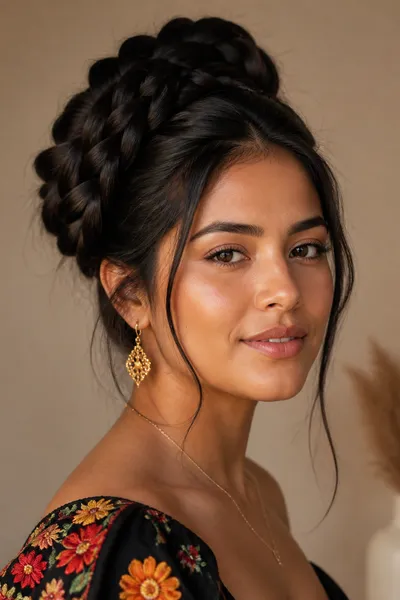
16. Extension-Boosted Voluminous Crown
Clip-in extensions are woven into the crown before the hair is pulled up, giving fine or shorter hair the same dramatic height and fullness that naturally thick, long hair achieves without any extra effort. This is genuinely the best option on this list for fine hair or shorter lengths that still want serious volume and drama. It works on every face shape since the extra length and volume can be shaped to flatter whatever silhouette you need.
- Styling time: Salon-recommended, 45 to 60 minutes to blend the extensions seamlessly before styling.
- Ask your stylist for: "Clip-in extensions woven into the crown for extra volume and length before you style the updo, blended so no wefts show."
- Accessory and dress pairing: A statement metal comb or cuff placed at the crown where the extensions are hidden, paired with any neckline since the added length gives flexibility.
- All-night hold tip: Clip the extensions in close to the scalp and pin through both the natural hair and the wefts together, not just the natural hair, so nothing shifts separately.
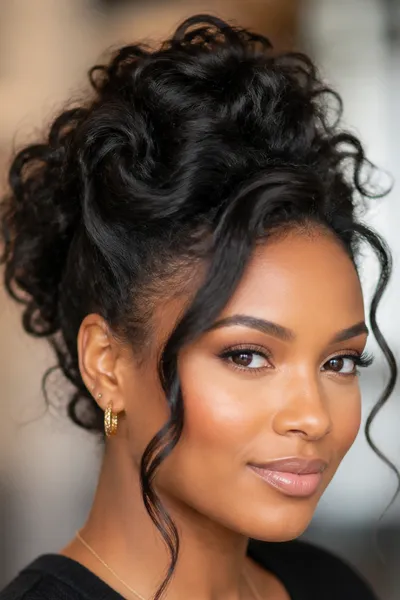
17. Sharp Ponytail with Sculptural Loops
A high, sleek ponytail is sectioned and looped back on itself two or three times, then pinned to create a sculptural, layered shape instead of letting the tail hang straight down. It suits oval and round faces best and needs at least mid-length hair, since shorter ponytails will not have enough length to loop and this is one of the better prom updos for long hair on this entire list. Straight and slightly wavy hair create the cleanest loops, while very curly hair may need a flat iron pass through the ponytail first.
- Styling time: Salon-recommended, 30 to 45 minutes for even, symmetrical loops.
- Ask your stylist for: "A high ponytail looped back on itself two or three times and pinned into sculptural sections, not left hanging straight."
- Accessory and dress pairing: A slim chain or crystal hairpin at the base of one loop, paired with a strapless or halter gown that keeps focus on the sculpted shape.
- All-night hold tip: Pin each loop individually with a bobby pin hidden underneath it, so if one loop loosens the others stay perfectly intact.
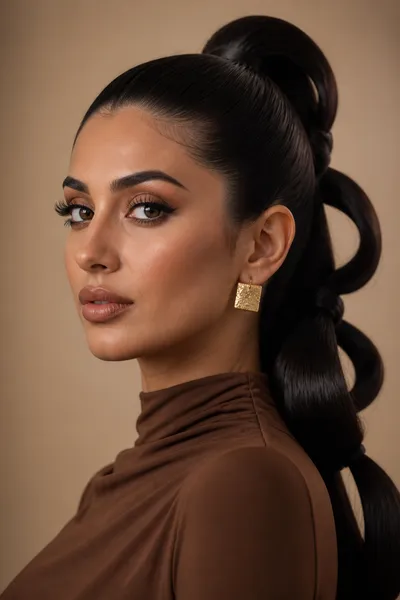
18. Avant-Garde Twisted Side Bun
This bun sits deliberately off-center at the side of the head, built from twisted sections rather than a simple wrap, giving it a directional, sculptural quality that reads as more editorial than a classic low bun. It flatters oval and long faces particularly well and works on medium to long hair with enough length to twist and gather to one side. Wavy and curly textures add extra dimension to the twists, while straight hair creates a cleaner, more graphic version of the same shape.
- Styling time: Salon-recommended, 30 to 45 minutes to balance the off-center placement.
- Ask your stylist for: "A twisted side bun placed off-center rather than centered at the nape, with visible twist texture, not a smooth wrap."
- Accessory and dress pairing: A single oversized sculptural pin at the base of the twist, paired with a one-shoulder or asymmetrical dress that mirrors the off-center placement.
- All-night hold tip: Pin the twisted sections at multiple points along the twist, not just at the base, since twists are more prone to loosening in the middle than a smooth bun.
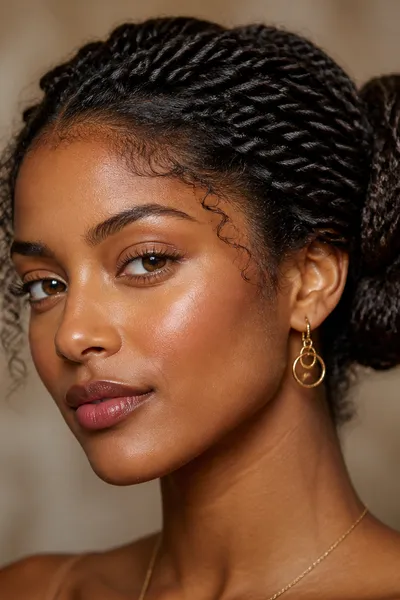
19. Coiled Rope Braid Updo
Two or three rope braids, made by twisting two sections of hair together rather than a traditional three-strand braid, are coiled and pinned into a dense, textured updo with a lot of visual dimension. It suits nearly every face shape depending on where the coils are placed, and it works best on medium to long, thick hair that gives the rope braids enough volume to coil densely. Fine hair can still achieve this with clip-in extensions added before the braiding starts.
- Styling time: Salon-recommended, 45 to 60 minutes for multiple rope braids and careful coiling.
- Ask your stylist for: "Rope braids, twisted rather than three-strand, coiled and pinned densely for texture and volume."
- Accessory and dress pairing: A scattering of small crystal or metal pins throughout the coils, paired with a fitted gown with a plunge or cutout back to balance the density up top.
- All-night hold tip: Coil the braids tightly and pin through the center of each coil rather than just around the edges, so the density holds together as one unit.
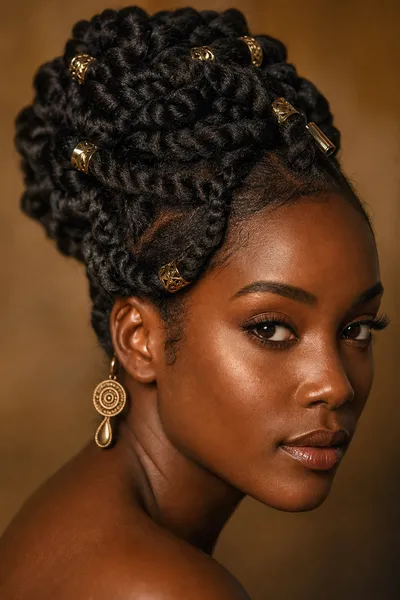
20. Gravity-Defying Vertical Bun
This is the most dramatic style on the list: a bun built to stand straight up and slightly forward from the crown rather than sitting flat against the head, using serious backcombing or a bun-shaping insert for support. It is best suited to oval and long faces that can carry the added height without looking overwhelmed, and it requires medium to long, thick hair or extensions for the volume needed to hold the vertical shape. This is a true showstopper look best left to a stylist experienced with sculptural styling.
- Styling time: Salon-only, 45 to 60 minutes minimum, and it is worth doing a trial run before prom night.
- Ask your stylist for: "A vertical bun built up and slightly forward from the crown, using a shaping insert or heavy backcombing for support, not a flat bun laid on top of the head."
- Accessory and dress pairing: A single dramatic metal spike pin or sculptural comb at the base, paired with a simple, unfussy gown so the bun remains the clear focal point.
- All-night hold tip: Use a strong-hold pomade at the base before backcombing, and check in with your stylist about a bun-shaping insert for extra support through hours of movement.
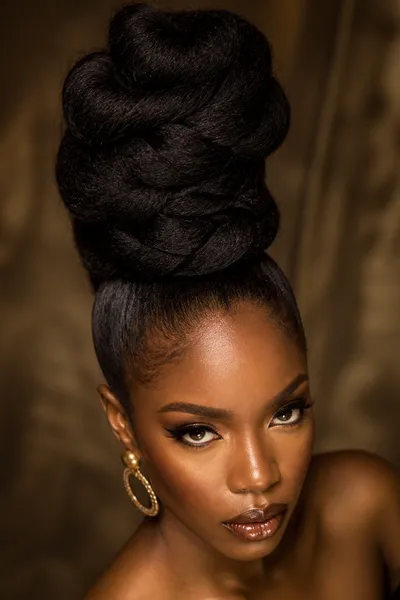
Bold Hair Accessories and Dress Pairings for Maximum Drama
Bold Hair Accessories and Dress Pairings for Maximum Drama
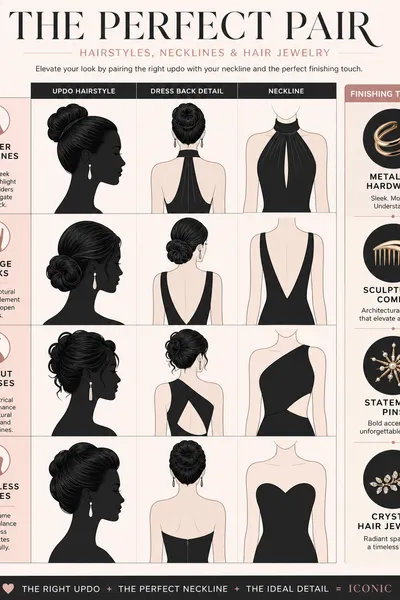
Skip pearls, flowers, and soft ribbon here — they read as romantic no matter how they're placed. Reach for sculptural metal hardware, oversized pins and combs, chain or crystal jewelry, and structural cuffs or spikes instead. Mixing more than one category at once usually looks too busy for a single style.
Halter and cutout necklines pair best with high, sleek shapes like the architectural ponytail, while plunge and open-back dresses suit low, sculptural buns that show off exposed skin. Skipping the accessory is fine too — the shape alone can carry the drama, so just avoid pairing a heavily embellished gown with an equally busy updo. For a gentler middle ground, try our half up half down guide instead.
How to Make Your Bold Updo Last All Night
How to Make Your Bold Updo Last All Night
Wash the night before, not the morning of — clean hair is slippery, while second-day texture gives pins something to grip. Use a strong-hold gel or pomade at the base, then a flexible spray on top so it holds without feeling stiff. This matters most for heavy backcombing or sculptural shaping.
Combat humidity with a spray before you leave, and ask your stylist to hide extra pins at stress points. Pack pins, a mini comb, and travel hairspray for touch-ups. Very tight styles can cause scalp tenderness, so ease up if needed; see the American Academy of Dermatology's general guidance on tight hairstyles or our braided updo maintenance guide for more.
Budget and Appointment Timeline for a Statement Updo
Budget and Appointment Timeline for a Statement Updo
Book a trial three to four weeks before prom, then confirm your final appointment one to two weeks out. Wash and prep the morning of unless your stylist says otherwise. Cost varies by salon and technique, so ask directly and budget more for extensions or heavy backcombing.
Some styles here are realistic to DIY with practice, like the architectural ponytail, bubble ponytail, wet-look bun, and metallic cuff bun. Finger waves, rope braids, the vertical bun, and precise asymmetry are best left to a pro. Either way, practice your look once before prom night to avoid day-of stress.
FAQ About Bold Prom Updos
FAQ About Bold Prom Updos
What hairstyle is best for a bold prom look? Sculptural, high-structure styles like a sharp center-part bun, a twisted faux hawk, or a sleek architectural ponytail tend to read as the boldest on this list, since all three build real height and clean lines instead of relying on soft waves. The right pick for you specifically depends on your face shape and hair length, so use the "How to Choose" section above before settling on a favorite. If you are still torn between two options, lean toward whichever one your stylist can confidently recreate on your exact hair texture, since a well-executed simple shape will always beat a rushed, overly complicated one.
How do you add volume and height to fine or short hair for an updo? Backcombing at the crown, a strong-hold volumizing product, and clip-in extensions are the three most reliable tools for fine or shorter hair chasing real height and drama. The extension-boosted voluminous crown style earlier in this post is specifically designed around this exact problem, and it is worth mentioning to your stylist even if you end up choosing a different overall shape. Layering all three techniques together, rather than relying on just one, usually produces the fullest and longest-lasting result.
What should I tell my stylist to get a structured, sculptural updo? Use the exact phrasing given for each style in this post, since specific, technical language like "backcombed for height" or "wrapped base, not an elastic showing" communicates far more clearly than a vague request for something "bold." Screenshotting the specific style and bringing it in also helps a great deal, since photos capture angles and proportions that are hard to describe out loud. If your stylist suggests a small adjustment based on your hair's length or texture, it usually means they are protecting the final shape rather than talking you out of the look.
How do I keep a high-drama updo from falling out while dancing? Wash your hair the day before rather than the morning of, use a strong-hold product at the base of your style, and ask your stylist to hide a few extra pins at the stress points specific to your chosen look. Bringing a small touch-up kit with spare pins and a travel hairspray covers you for the rest of the night, especially if your evening runs late or includes an after-party. A quick check in the bathroom mirror every hour or two also helps you catch any loosening before it shows up in photos.
Are bold updos harder to do than romantic updos? Many bold, structured styles require more precision and technical skill than soft, romantic looks, which is why several styles on this list are marked as salon-recommended rather than DIY-friendly. That said, a handful of the bolder styles here, like the wet-look bun and the bubble ponytail, are genuinely approachable to try at home with a little practice and the right products. If you are unsure how much of the look you can maintain yourself, book a trial run before prom night so you and your stylist can decide together how to plan for touch-ups later in the evening. Either way, planning ahead is what makes bold prom updos look effortless on the actual night.
Bold prom updos are for you if you want your hair to be the headline, not a backdrop, and every style on this list is built to deliver exactly that kind of statement. Pick your top two or three favorites, screenshot the exact stylist wording for each one, and book that trial run three to four weeks out so you walk into prom knowing your hair will hold. If you find yourself drawn back to something softer after all this, that's completely fine too, and our romantic prom updo roundup is right there waiting for you.
Your email address will not be published. Required fields are marked *